Setting up Mixxx with Airtime Pro
Mixxx is a 3rd party application that you can use to broadcast live to your audience. Sourcefabric is not affiliated with Mixxx, but we know some of our users are interested in learning how to broadcast live, so we have provided this step-by-step tutorial. Currently, broadcasting live requires the integration of a 3rd party software such as Mixxx. Mixxx is free and open-sourced.
Step 1: Download Mixxx
First, download a copy of Mixxx onto your computer. You can download a free copy by visiting www.mixxx.org . Mixxx can be used with Windows, Mac, Ubuntu and Linux operating systems.

Step 2: Open Mixxx
Once you’ve downloaded an appropriate copy of Mixxx, open it on your computer. When you open Mixxx for the first time, you will be prompted to select a folder on your computer containing music. Mixxx will then create a folder there. This folder is where your recordings will be saved, if you choose to record your broadcasts using Mixxx.
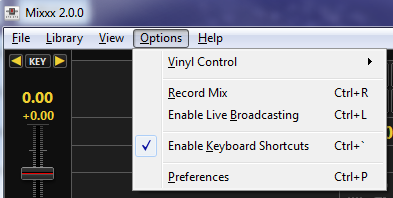
In Mixxx, select Options > Preferences from the main menu.
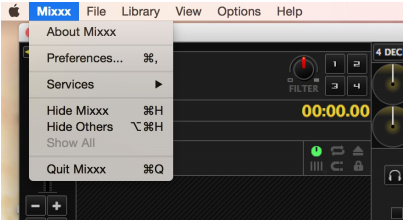
If you are using a Mac, you will find the Mixxx Preferences menu in the Mixxx menu in the top menu bar beside the apple logo, as pictured above.
Step 3: In Mixxx, adjust your Live Broadcasting preferences.
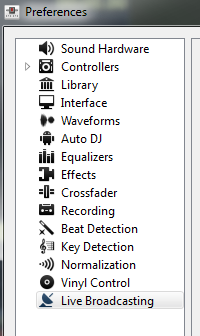
In the Preferences menu, select Live Broadcasting at the bottom of the list.
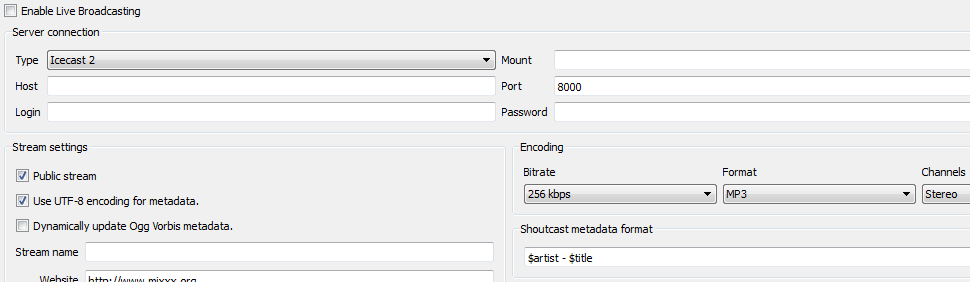
Unless you are using custom Airtime hosting, set the server connection type to Icecast 2. In Airtime, find the other connection details by selecting Help > Broadcasting Live > I have broadcasting software > Mixxx.
Step 4: Copy your connection details from Airtime Pro to Mixxx.
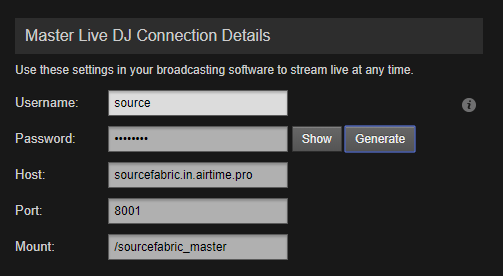
In Airtime Pro, find your custom Connection Details by selecting Settings > Streams > Live Broadcasting > Master Live DJ Connection Details. An example is shown below. Copy the details exactly as they appear in the text boxes into the Host, Login, Mount, Port and Password fields in the Mixxx interface.
When you have entered the information, click the Save button at the bottom of the window in Mixxx.
If you are a DJ for a station, contact your Airtime Pro admin so that they can provide you with the appropriate stream connection details.
Step 5: Install the Mixxx live broadcast plug-in.
With Mixxx 2.0.0, an additional plug-in is required to enable live broadcasting, which is disabled by default in Mixxx. Further instructions are found on the Mixxx wiki: http://mixxx.org/wiki/doku.php/internet_broadcasting#windows . For windows, you will need the LAME libmp3lame binaries.
Step 6: Start broadcasting live.
Once you have installed that plug-in you are ready to begin your live broadcast session in Mixxx. To do this, in Mixxx select Options > Enable Live Broadcasting to go live. You can now start mixing tracks using the Mixxx interface.
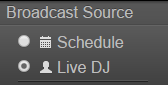
In Airtime, check to see if 'Auto Switch to LiveDJ' is enabled in your Live Broadcasting settings. If it's not, you will need to manually switch to LiveDJ in Airtime Pro by changing the Broadcast Source at the top of the Airtime interface.
Step 7: Disconnect at the end of your session.
When you have completed your DJing session, use the shortcut CTRL + L to exit the live steam. When Mixxx disconnects from Airtime, your broadcast source will revert to your normal Airtime schedule automatically.
0 Comments